
Can You Wheelchair Moab? Here’s What You Need to Know
A lot of travelers wonder if they can actually wheelchair Moab. Well, technically, you can – but in specific areas only.
Planning a short trip around wheelchair-friendly views and paths in Moab means picking places with reliable pavement (or firm “hardened” tread), easy parking, and bathrooms you can count on.
If you want the highest scenery-per-minute, build your day around (1) Arches’ short accessible viewpoints, (2) Canyonlands’ drive-up overlooks, and (3) a sunset stop at Dead Horse Point.
In this guide, you’ll get practical, on-the-ground route ideas for wheelchair Moab: paved overlooks, in-town paths, what surfaces feel like under wheels, and where you may want a helper for short sandy stretches.
Table of Contents
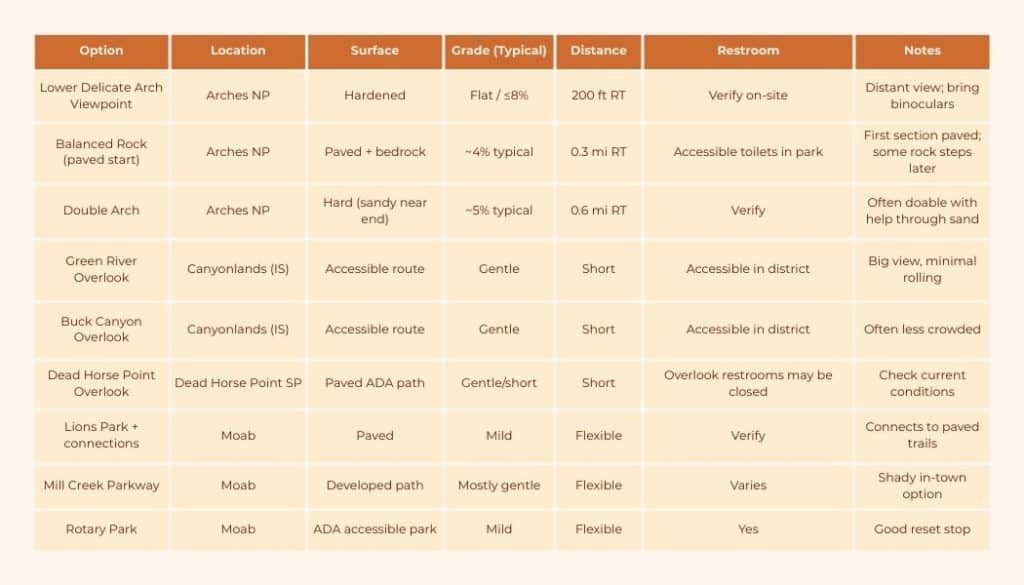
9 Options at Glance (Comparison)
Paved Overlooks
Arches National Park: Lower Delicate Arch Viewpoint
This is the easiest way to see Delicate Arch without the steep main hike. The NPS lists the Lower Viewpoint as level, hardened, wide, and wheelchair accessible, with a very short distance.
Accessibility quick facts
- Surface: hardened “hard surface” path
- Typical grade/steepness: essentially flat (NPS notes ≤8% grade)
- Approx. distance: 200 ft roundtrip (to the lower viewpoint)
- Curb cuts/ramps: at paved parking area; path is wide
- Parking notes: standard viewpoint lot; arrive early for closer spaces
- Restroom availability: confirm at the stop (varies by season/maintenance); nearby facilities in the park are generally accessible
- Best time of day: early morning for cooler temps; late afternoon for color (bring binoculars or a zoom lens because the arch is distant)
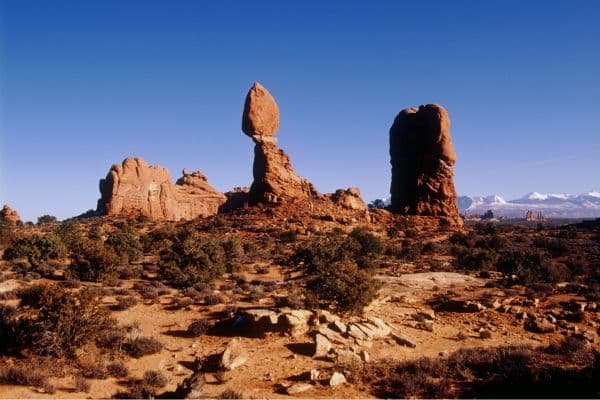
Arches National Park: Balanced Rock (viewing area + short loop)
Balanced Rock is a classic “pull off, roll a bit, get a postcard view” stop. The NPS states the first section is paved with a modest grade; beyond that, the loop includes bedrock and some rock steps.
Accessibility quick facts
- Surface: paved first section; then pavement + bedrock mix
- Typical grade/steepness: typical ~4% with steeper segments; first paved section max grade noted at 7%
- Approx. distance: 0.3 mi roundtrip loop
- Curb cuts/ramps: paved approach from parking
- Parking notes: popular; mid-morning fills fast in peak season
- Restroom availability: picnic areas near Balanced Rock have paved sections; toilets in the park are listed as accessible
- Best time of day: sunrise/early morning (quiet + cool)
Arches National Park: Double Arch (mostly hard surface, a little sand near the end)
Double Arch is listed by NPS as a hard surface route with no obstructions, though it can get sandy near the end. That usually means many manual chair users do fine with steady pushing, while some power chairs may slow in sand.
Accessibility quick facts
- Surface: hard-packed, sandy near end
- Typical grade/steepness: typical ~5%; max listed 14%
- Approx. distance: 0.6 mi roundtrip
- Curb cuts/ramps: paved parking area access
- Parking notes: shares the busy Windows area—go early
- Restroom availability: check at the Windows area; park toilets are listed as accessible overall
- Best time of day: early morning (fewer people + less heat reflecting off rock)
Canyonlands (Island in the Sky): Green River Overlook
Canyonlands’ NPS accessibility page specifically lists Green River Overlook as wheelchair accessible, and notes all toilets at Island in the Sky are accessible.
Accessibility quick facts
- Surface: typically a short paved/packed route from parking (confirm current tread at visitor center)
- Typical grade/steepness: generally gentle; may have slight ramping
- Approx. distance: short roll from the lot (confirm exact distance on arrival)
- Curb cuts/ramps: pullout-style parking with accessible routes
- Parking notes: parking is usually easier here than Arches’ busiest stops
- Restroom availability: accessible toilets are available in the Island in the Sky district
- Best time of day: late afternoon for depth and shadow in the canyons
Canyonlands (Island in the Sky): Buck Canyon Overlook
Another NPS-listed wheelchair accessible overlook, great if you want a second big view with minimal effort.
Accessibility quick facts
- Surface: accessible route from overlook parking (confirm exact tread)
- Typical grade/steepness: mostly gentle
- Approx. distance: short roll from parking
- Curb cuts/ramps: accessible route expected at the overlook area
- Parking notes: pullout parking; wind can be strong here
- Restroom availability: accessible toilets in the district (not at every single overlook—ask at visitor center)
- Best time of day: morning for clearer air; sunset for color (watch wind)
Dead Horse Point State Park: Main overlook (paved ADA path)
Utah State Parks calls out a short paved ADA accessible pathway from the overlook parking lot to the main viewpoint. This is one of the best “minimal rolling, maximum payoff” stops near Moab.
Accessibility quick facts
- Surface: paved ADA path from parking to viewpoint
- Typical grade/steepness: gentle/short; some exposure near rim
- Approx. distance: short walk/roll from the lot (exact distance not specified on the trail page—expect very close)
- Curb cuts/ramps: accessible path begins at the overlook parking area
- Parking notes: arrive before sunset; it’s a popular photo stop
- Restroom availability: current conditions can change—Utah State Parks notes the overlook restrooms are currently closed, while visitor center and campground restrooms remain open
- Best time of day: sunset (iconic), or early morning for calm + cooler temps
Accessible Town Paths
Lions Park + paved trail connections (easy add-on day)
The NPS describes Lions Park as a hub with direct connections to many paved trails and a convenient location just north of downtown. It’s a great low-stress option for an accessible Moab break between park drives.
Accessibility quick facts
- Surface: paved park paths and paved trail connections
- Typical grade/steepness: generally mild; some ramps depending on where you connect
- Approx. distance: flexible out-and-back (choose your turnaround)
- Curb cuts/ramps: typical park access; confirm specific crossings at trailheads
- Parking notes: convenient for quick stops
- Restroom availability: varies by season and facility (verify on-site)
- Best time of day: morning or golden hour (less heat, prettier light)
Mill Creek Parkway (in-town, quieter roll)
Moab’s official city page describes Mill Creek Parkway as a non-motorized recreational path running through town along the creek corridor. It’s a good “recovery stroll” option with more shade than you’ll get on exposed overlooks.
Accessibility quick facts
- Surface: developed multi-use path (confirm paved segments you want to use at your entry point)
- Typical grade/steepness: mostly gentle, with small ramps where it meets streets
- Approx. distance: choose-your-own out-and-back (multiple access points)
- Curb cuts/ramps: many street crossings in town; use marked crossings where possible
- Parking notes: easiest if you start near a park or public lot
- Restroom availability: depends where you enter/exit; pair it with a stop at a park with facilities
- Best time of day: late afternoon (shade + less traffic)
Rotary Park (easy stop with facilities)
Moab’s city facility listing flags Rotary Park as ADA accessible and lists restrooms and parking on-site. This is a useful “reset stop” if you need a reliable break.
Accessibility quick facts
- Surface: park paths/grounds; ADA accessible features listed
- Typical grade/steepness: mostly mild around the park core
- Approx. distance: flexible (short loops/rolls within the park)
- Curb cuts/ramps: ADA accessible noted by the city
- Parking notes: on-site parking
- Restroom availability: listed on the city facility page
- Best time of day: midday break (shade + downtime), or early evening for cooler temps
Parking and Restrooms (What to Expect)
- Arches: NPS notes all toilets in the park are accessible, but that doesn’t mean every restroom is open every day. Use the Arches Alerts & Conditions page before you go, and have a backup stop in mind.
- Canyonlands (Island in the Sky): NPS states all toilets at Island in the Sky are accessible. Confirm which overlooks have toilets vs. which require a stop at the visitor center area.
- Dead Horse Point: Check the park’s Current Conditions page. As of the latest update, overlook restrooms are closed while other facilities remain open.
Practical tip: If bladder timing is a big constraint, plan your route around visitor centers and campgrounds (more consistent facilities) rather than assuming every overlook has a restroom.
Surfaces and Grades (What Your Wheels Will Feel)
Desert parks love these terms:
- Pavement / paved: smoothest and most predictable (best for manual chairs and power chairs).
- Hard / hardened / firm: usually compacted gravel or stabilized tread. Often fine, but small sand drifts can feel like hitting a brake.
- Bedrock: solid rock that can be smooth, bumpy, or tilted; watch cross-slope (sideways lean).
- Sand: the energy drain. Bring a helper if you’re not sure.
If you want the most detailed tread and grade info, Arches is unusually transparent: the NPS lists typical and maximum grades for several routes (including Double Arch and Balanced Rock) and notes where paved sections begin.
Confidence-with-caveats: Even “accessible” routes can change after rain, snow, freeze-thaw, or heavy foot traffic. The NPS explicitly warns that temporary obstructions (rockfall, gullies, potholes) can appear.
Seasonal Tips (Timing Matters Here)
- Heat: In warm months, plan your wheelchair accessible trails and overlooks early. Rock reflects heat upward, and shade is limited.
- Wind: Island in the Sky and Dead Horse Point can be surprisingly gusty near rims.
- Winter: shaded pavement can hold ice longer than you expect; keep traction in mind for companions.
- Arches timed entry: For 2026, NPS says reservations may be needed and to monitor the official page for updates.
Safety
- Cliff edges: Some overlooks feel wide and calm; others feel exposed. If you use a power chair, consider stopping well back from edges on windy days.
- Sun + hydration: desert dehydration sneaks up fast, especially if you’re not “feeling sweaty” while seated.
- Traffic/crowds: Arches parking lots can fill, and the park may temporarily delay entry when lots reach capacity.
Plan Your Day (Sample Itinerary)
Half-day “views + easy roll” plan
- Early morning: Arches — Lower Delicate Arch Viewpoint (cool temps, easy roll).
- Mid-morning: Arches — Balanced Rock (quick, iconic).
- Lunch/rest break: back in accessible Moab — Rotary Park or a café stop.
- Afternoon: Canyonlands (Island in the Sky) — Green River Overlook + Buck Canyon Overlook (big payoff, low effort).
- Sunset: Dead Horse Point main overlook (check restroom status first).
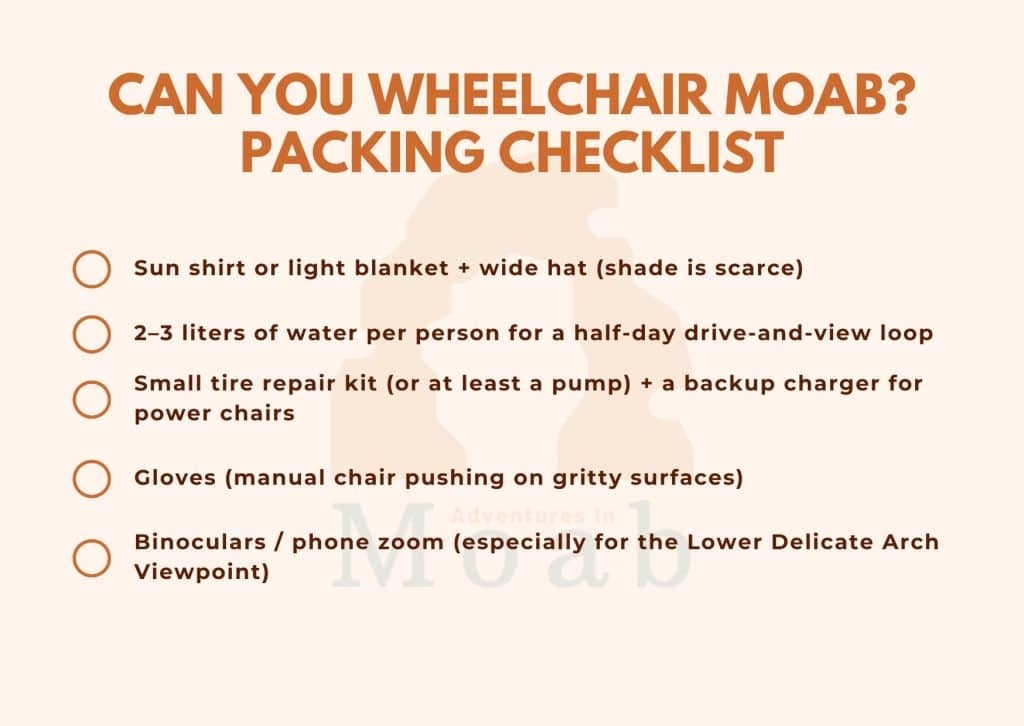
Packing Checklist
FAQs
Are there truly wheelchair accessible trails in Arches?
Yes, but think “short routes to viewpoints,” not long backcountry hikes. Arches publishes detailed mobility/grade info for multiple trails and explicitly notes accessible toilets park-wide.
Which stop is the easiest “I can do this solo” option?
Lower Delicate Arch Viewpoint is the clearest low-effort win: very short distance, wide hardened surface, minimal grade.
What’s the best option if sand is a deal-breaker?
Prioritize paved overlooks and paved ADA paths: Dead Horse Point’s main overlook path and the paved starts at some Arches stops. For anything described as “sandy near end,” plan to turn around early.
Do Canyonlands overlooks have accessible bathrooms?
NPS states all toilets at Island in the Sky are accessible, but not every overlook has a toilet right at the viewpoint. Confirm at the visitor center when you arrive.
What should I check the morning of my visit?
– Arches Alerts & Conditions (capacity delays, closures)
– Dead Horse Point Current Conditions (restroom closures happen)
– If visiting in peak season, Arches Timed Entry updates for 2026
Is Moab itself good for a low-key roll day?
Yes. Lions Park connects to paved trails, and Mill Creek Parkway is a calm non-motorized corridor through town. It’s a great “rest day” plan for wheelchair travel.
Conclusion
Moab rewards smart, surface-first planning: stack a few verified accessible overlooks, add an in-town paved path for a break, and keep a backup stop in your pocket when a restroom closes or wind picks up.
If you use this guide as your checklist (surface, grade, distance, bathrooms, timing), you’ll spend less time troubleshooting and more time soaking in the views that make wheelchair Moab such a standout trip.